The zodiacal light is a notoriously sought-after subject of astrophotography. Because of its enthralling appeal, many desire to witness its mystical glow and capture its beauty on camera.
For a few weeks in March and April, the zodiacal light shares its magnificence with anyone lucky enough to look up at the right moment.
Unfortunately, some miss the memo, and with it, the chance to glimpse the extraordinary spectacle illuminating the night sky.
If you’re looking for another chance to catch and get the celestial wonder on your camera, you’re in the right place.
Below, we’ll discuss everything you need to know to photograph the zodiacal light in a few easy steps.
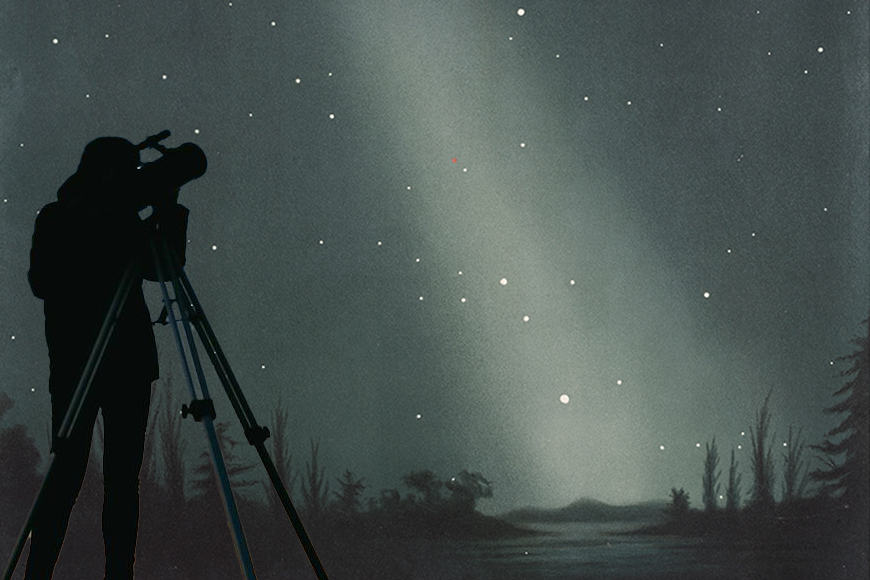
What Is the Zodiacal Light?
Credit: Étienne Léopold Trouvelot, Crystal Bridges Museum of American Art, Bentonville, Arkansas, 2006.48.5, CC0, via Wikimedia Commons
The zodiacal light, also called “false dawn,” is a cosmic phenomenon characterized by a faint and diffused triangular glow in the night sky when the sun is setting or rising.
What causes this ghostly glow to appear is when sunlight hits the stream of dust orbiting between the Earth and the Sun.
When Is the Zodiacal Visible?
You want several factors to align to witness this ethereal event with your eyes or camera.
First, the sky needs to be dark. If you live in a city with too much light pollution blurring the night sky, you may need to change locations to see the Zodiacal light.
Thankfully, there are plenty of dark sky maps available online (like this one) that you can use to pick the best locations for viewing celestial bodies and events.
That said, given the incredibly faint glow it emits, natural light is as problematic and can make it invisible. So, it’s best to pick a date without a full moon and with clear skies.
The zodiacal light is best viewed before sunrise during autumn and after sunset in spring. These times are when the glow angles steeply on the horizon, making it more visible to the naked eye.
Once these factors are met, you can witness the zodiacal light appearing on the horizon with its cone-shaped glow extending along the ecliptic path.
The zodiacal light is visible in both hemispheres twice every year. When viewed in spring, the glow can be seen for up to one hour after dusk. It lasts as long in the autumn, only appearing before dawn.
How to Photograph the Zodiacal Light
As you may already have guessed, capturing the zodiacal light on camera requires plenty of planning and luck.
Camera and Lenses
Starting with the obvious, you’ll need a camera capable of snapping clear pictures under low-light conditions.
Ideally, you want a camera with excellent ISO performance, a wide-angle lens, a suitable shutter speed, and anti-shake gear (tripod, equatorial mount, remote shutter release, etc.).
Because the zodiacal light extends above the horizon, you want your wide-angle lens to have a focal length of at least 14mm to 35mm to capture the entire spectacle.
We’d recommend investing in high-end cameras with APS-C or Micro 4/3 sensors. Think of the Nikon D500 and the Olympus OM-1, or full-frame cameras like the Nikon Zf, Panasonic S5 II, and Sony a7 IV.
Nevertheless, mid-range camera units like Nikon Z50, Canon R10, Panasonic G9 II, and Sony a7C II should also work.
How Much Do You REALLY Know About Photography?! 🤔
Test your photography knowledge with this quick quiz!
See how much you really know about photography…

Camera Settings
For your settings, you want the aperture as wide as possible to allow as much light to register the faint flow of the zodiacal light. Think between f/1.4 and f/2.8 or higher.
Using the manual mode is also preferable for easy adjustments.
Next, turn the camera’s ISO or film speed to 1600 if you’re using f/2.8 aperture or 3200 if your camera maxes at f/3.5.
Once set, you can point the camera on the horizon and adjust accordingly. Aim for a relatively deep but not overexposed night sky.
You’ll essentially be shooting long exposure shots. So, you want the camera as still as possible throughout the session.
Using a tripod to stabilize the camera and a cable release for remote shutter pressing would be handy to save time in these scenarios. Remember, you’ll only have less than an hour!
Experiment with your exposures (time and f/stops) to find the best setting for your camera and location. But given the limited time, you may take note of the settings and continue shooting the next dawn or dusk.
Another issue that may arise from long exposure shots is star trails. These are white streaks captured on a camera as the Earth rotates around its axis, which can ruin your zodiacal light photos.
Star trails can be tricky to address, but here’s a quick trick you can use:
Use the 500 rule to determine how much exposure your camera can handle without producing star trails. Divide 500 by the length of your camera’s lens, and set your shutter speed based on the result.
For example, if you’re using a 20mm wide-angle lens, you divide 500 by 20 giving you 25, the optimal seconds you can shoot before the stars begin to streak.
An equatorial mount is another superb tool to compensate for the Earth’s movement while shooting. By “locking into” the target, you won’t have to worry about the subject drifting outside the frame and leaving streaks behind.
Try a Foreground Composition!
Choose a location with landscapes to add interesting composition to your zodiacal light images. Think of mountains, hills, deserts, seascapes, lakes, or trees.
If you live somewhere in the northern hemisphere, you may catch the zodiacal light together with the Milky Way during astronomical twilight in the fall season.
Aiming to the south and using a 20mm lens camera, you can combine these magnificent cosmic views into one frame.
Final Thoughts
The zodiacal light is a challenging astrophotography subject to capture. You’ll need a suitable camera, location, gear, and plenty of good luck to catch the cosmic wonder in all its magnificence.
But don’t worry, with these expert tips, you’re sure to snap the best pictures of the false dawn’s ethereal glow!
Credit : Source Post


