This guide will give you the easiest ways to remove dust and scratches from photos using Lightroom.
I’ve been using Adobe Lightroom for many years, and I often need to remove pesky scratches or dust from images.
Using Lightroom’s Develop mode, you can remove imperfections from old family photos or scanned images.
Let’s dive into the tutorial.
HIGHLY RECOMMENDED
Popular course reveals the simple tricks to getting incredible results with Lightroom in record time.
Give Your Photos The Look They Deserve!
How to Remove Dust and Scratches from Photos in Lightroom
Vintage and old family photos are historically interesting and can hold sentimental value. They can also make beautiful, intriguing art pieces.
Restoring antique photos helps preserve these captivating lost moments.
Although we accept that specks and scratches are an inevitable factor in antique photos’ aging, they can distract the viewer from their sublime, timeless beauty.
While old photos gain imperfections from natural wear and tear, dust can also materialize when photos are scanned.
Anyone who has scanned a photo knows that dust has a way of magically appearing, no matter how fastidiously you clean and polish the workspace.
There’s only so much time one can devote to repeatedly vacuuming the air in an effort to rid the space of dust. That’s why I opt to use Lightroom.
Lightroom has all the necessary editing tools to eradicate dusty and distracting flaws.
Scanning software usually has a dust-removing feature, but unfortunately, it can also blur the crisp lines of a photo. Plus, it won’t remove scratches.
Using Lightroom, you will have the tools to zoom in and remove the exact imperfection you need to remove without softening a photo’s sharpness.
Although removing lots of spots can be time-consuming, this technique gives you optimum editing control to achieve the best possible end result.
Step 1 – Open the Photo in Develop Module
First, we open the image in Lightroom’s Develop module.
Open Lightroom’s Library and select the photo from which you wish to remove the imperfections.
Now click the Develop button at the top right of the canvas workspace to open the image in Lightroom’s Develop mode.

The photo will open in Lightroom’s workspace with the Develop module editing panel on the right-hand side.
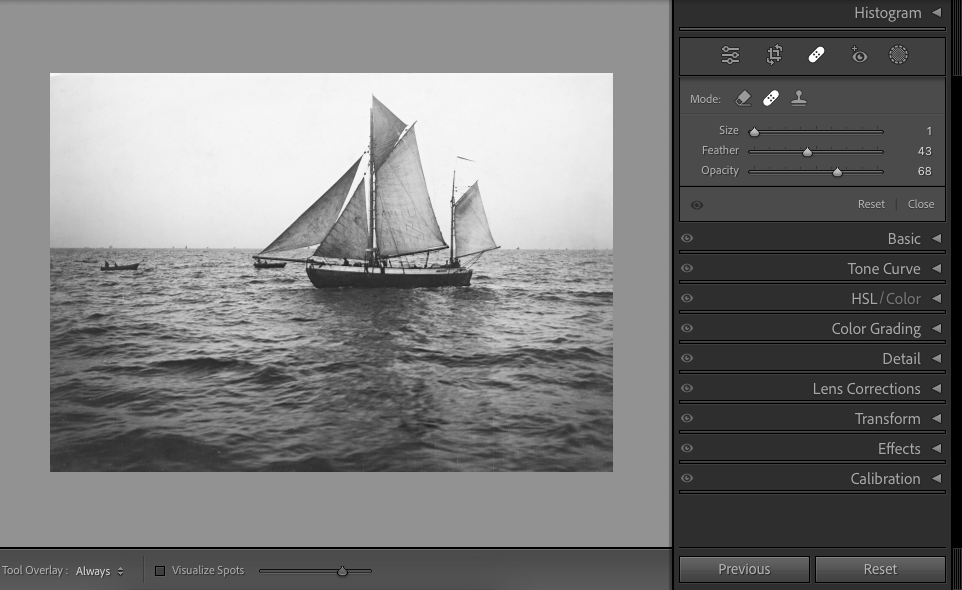
I will use a scanned photo of a sail boat for this tutorial. This photo has slight imperfections and dust particles, which can be smoothed away using Lightroom’s Healing tool.
Step 2 – Activate the Healing Tool
When your image is open in the Develop module, head to the top right of the editing panel and click the band-aid icon.
Alternatively, for the keyboard shortcut, hit Q. The Healing Brush editing panel will open.
At the bottom of the canvas workspace, beneath the photo, you’ll find a box beside Visualize Spots. Check this box.
Once clicked, the image will snap to a monochrome inverted view of the image. If you wish to return to the original image at any time, uncheck the box.
Slide the Visualize Spot slider to the right, and spots and imperfections will be highlighted in white.
Not only will dust be highlighted, but the image’s finer details will be too.

In the image above, the waves and outline of the boat are highlighted. However, our objective is to highlight and remove the flaws in the sky.
To highlight the specks of dust, increase the slider beside Visualize Spots gradually to the right.

When the slider is moved to the right, almost to the centre, a slight scratch becomes evident in the top left corner of the photo.
We move the slider more to the right to draw out more imperfections.

When the slider is moved past the centre, the specks of dust come into view. Using Lightroom’s Visualize Spots feature, we now have a clear view of the dust particles we wish to remove.
You can move the Visualize Spots slider even further to the right, and Lightroom will continue highlighting new particles.
The particles Lightroom finds might not need to be removed, so it’s important to know where to set the slider.
To do this, you can uncheck the box beside the Visualize Spots slider to view the image in its natural state.
By doing this, you can gauge the best position to set the slider.
It’s important to decide how meticulous you wish to be with your editing, remembering that it’s possible to overedit.
Step 3 – Zoom in
Zooming in on the photo allows us to gain a more detailed view of the small dust particles, helping us to make accurate edits.
To zoom in, you have two options: the Navigator panel at the top left of the workspace or the keyboard shortcut.
For the keyboard shortcut, hold down Command plus + (for Macs) or Ctrl plus + (for Windows).

I prefer to use keyboard shortcuts because they’re quick and easier to access. Plus, when you use keyboard shortcuts regularly, they become a reflex action.
When you need to pan across the image, hold down the space bar and drag the cursor across the canvas.
Alternately, drag the Navigator’s preview box into position.
When you need to zoom out for an overview of your work, hold Command plus — (for Macs) or Ctrl plus — (for Windows).
Step 4 – Set the Healing Brush Tool Settings
The Healing tool has replaced Lightroom’s Spot Removal tool.
It can be used to remove unwanted spots in the same way as the Spot Removal tool, and it has the added bonus of being able to draw lines or shapes.
When you’ve zoomed in on your photo enough to see the dust specks clearly, it’s time to adjust the Healing Brush’s settings.
There are three settings in the Healing editing panel: Size, Feather, and Opacity.
We will first adjust the brush size. Sliding the Size slider to the right will increase the size of the brush, and to the left will decrease it.

To gauge if the brush tip is the correct size, hover your cursor over a dust particle you wish to remove from the photo.
Two circles will appear. The inner circle demonstrates the size of the area that will be cloned; this is the target area.
The area between the larger and smaller circles demonstrates the amount of feathering.
Make sure the inner circle is large enough to cover the dust speck but not so large that it indiscriminately edits extra areas.
When you are happy with the brush size, adjust the second slider in the panel, the Feathering slider.
Adding an area of Feathering will aid in successfully blending the newly cloned area naturally into the photo.
To erase dust particles in my photo, I have set the Size slider to 20 and the Feathering slider to 43.
I have set the opacity to 88. The Healing Brush uses a sample area from another part of the photo to ‘clone’ over the target area.

I have zoomed in close to the top of the boat’s sail. By unchecking the box beside Visualize Spots, we can see how many obvious small dust specks and scratches are in the image.
Step 5 – Brush the Photo to Remove Specks, Dust and Scratches
Cleaning this image will take fine, steady editing and bucketloads of patience.

Tick the box beside Visualize Spots to begin editing.
As you can see in the image above, the photo has a fair amount of obvious grain, which is also highlighted.
We don’t want to remove the grain, only the imperfections.

To start editing, simply click on the dust spot, and Lightroom’s AI will decide which clone area to use to replace the target area.
When editing long, thin scratches, alter the size and feathering of the brush to suit the scratch width and drag the brush along the length of the scratch.
You can usually rely on Lightroom to make a faultless correction, choosing a background area that blends perfectly.

When you’re editing, Lightroom adds band-aid icons to each patch you have edited.
If you find the icons distracting, you can turn them off by heading to the bottom left of your canvas and changing Always to Never.

When you want to see the band-aid icons again, simply flip the option back to Always.
If you are unhappy with an edit and want to delete it, activate it by clicking it. When a black line outlines the edited patch, hit Delete on your keyboard.
Alternatively, you can activate a patch to re-edit. To do this, click on the patch’s band-aid icon. When the patch is active, move the Brush sliders to adjust the patch’s size, feather, or opacity.
Sometimes Lightroom can make an ill-fitting cloning selection,
Instead of blending flawlessly, the correction sticks out like a glaring headlamp, but don’t fret; you don’t have to stick with it.
To correct Lightroom’s bad choice of cloning area, click down on the target area and drag it to find your preferred selection area.
When you have located a more fitting cloning area, release the cursor to indicate you wish this to replace the first selection.

Uncheck the box beside Visualize Spots and click Close at the bottom of the History Brush panel to see how the edited area looks.
Step 6 – Take a Before and After View
When the Healing Brush editing panel has closed, the viewing modes will appear at the bottom of the canvas workspace.
Click on the Before and After viewing mode to compare the before and after view.

As you can see in the image above, most of the dust particles and long scratches have been removed from this small section of the photo.
We have left the photo’s natural grain. If we remove it, the photo could start to look like a painting rather than a photo.
I would advise flipping back and forth between the Visualize Spots view and normal viewing mode when removing dust from photos.
Particularly when there is a lot of editing to be done. Otherwise, you run the risk of blurring the finer integral details of the photo.
Step 7 – Save the Photo
When you have edited one area of specks and tears, move to another section until the entire image is unblemished.
To save the photo for sharing or printing, head to the top menu bar and select File > Export.
Click the triangle beside Export Location to select the location to which you wish to save the image.
Open File Name to add a name for the photo. This is useful if you need to identify the image later.
Open the File Settings panel and select JPEG from Image Format.
The Color Spacing you select will depend on whether you wish to share the image on the Internet or print it.
If you wish to print a physical copy of the photo, use CMYK; alternatively, use RGB for internet use. (Read more about when to use CMYK vs RGB.)
Then, hit the Export button. Your perfect dust-free photo is saved and ready for future use.
We hope you enjoyed this tutorial and can use the editing techniques to ensure all your future scanning projects will be unblemished.
Antique photos are magnificent snippets of history, connecting us directly to the past. It’s worth dedicating the time to preserve them for future generations to enjoy.
If you enjoyed this tutorial and you want to learn more photo restorative tricks, you are sure to like – How to Fix Hot Spots in Lightroom.
FAQ
How to remove dust from a photo?
A super quick way to remove dust from a photo is by using photo editing software, such as Lightroom or Photoshop.
Both software programs have a Healing Brush and Clone tool. These two tools can erase dust particles.
How to remove marks in Lightroom?
To remove marks in Lightroom, open your photo in Lightroom Develop mode.
When the image is open, click the Band-Aid icon in the Develop editing panel to open the Healing tool.
To remove dust from the photo, set the size of the Healing Brush to suit the dust particle size.
Then, draw over the dust to remove it.
Does Lightroom have object eraser?
Lightroom has a Content-Aware Remove tool that can be used to remove objects.
To remove objects using Content-Aware Remove, open the Healing editing panel and click the first icon, an eraser.
Drag your cursor around the object you wish to remove. Lightroom’s AI will remove it and replace it with a new background area.
How do you check for dust in Lightroom?
To check for dust in Lightroom, open the Healing editing panel. Then, go to the bottom of the image and check the box beside Visualize Spots.
The image will now flip to an inverted monochrome view; dust particles will be highlighted as white specks against the black background.
Slide the slider beside Visualize Spots to the right to bring smaller specks into view.
Credit : Source Post


