
If you want to learn how to edit photos in Lightroom, you’re in the right place.
Here, I’ll talk about all the options you have for editing photos using Lightroom. I’ll run you through how to use each tool and the recommended order.
Let me clarify that this is a step-by-step guide for Adobe Lightroom Classic. If you’re interested in learning about Lightroom CC and the Lightroom mobile app, you can check this guide.
Here, I’ll show you how to edit photos in Lightroom in the Develop module. I won’t cover how to import or organize your pictures. If you need to know more about that part of the process, check out this introduction to Adobe Lightroom.
Well, now that everything is clear – let’s get started!
How to Use the Develop Module in Lightroom
The Develop module lets you edit the photos uploaded to your library. This module is divided into three sections.
On the left side, you’ll find panels that allow you to browse your folders and collections to find the photo you want to edit. You’ll also be able to access different stages of your editing process and apply global edits.
The middle part is the canvas, where you can see the photo you’re editing. You can switch the view to access different functions, such as before and after comparisons or soft proofing.
On the right side, you’ll find the panels that carry all the editing tools with various properties.
Now that you know where everything is, let’s see how to edit photos in Lightroom.
Editing in the Develop Module
It’s important to know that all your photo edits in Lightroom are non-destructive. If you access your original file on your computer, you’ll notice that nothing has changed.
To save your edited image, you’ll need to export it.
Having said that, let’s see how to edit photos in Lightroom.
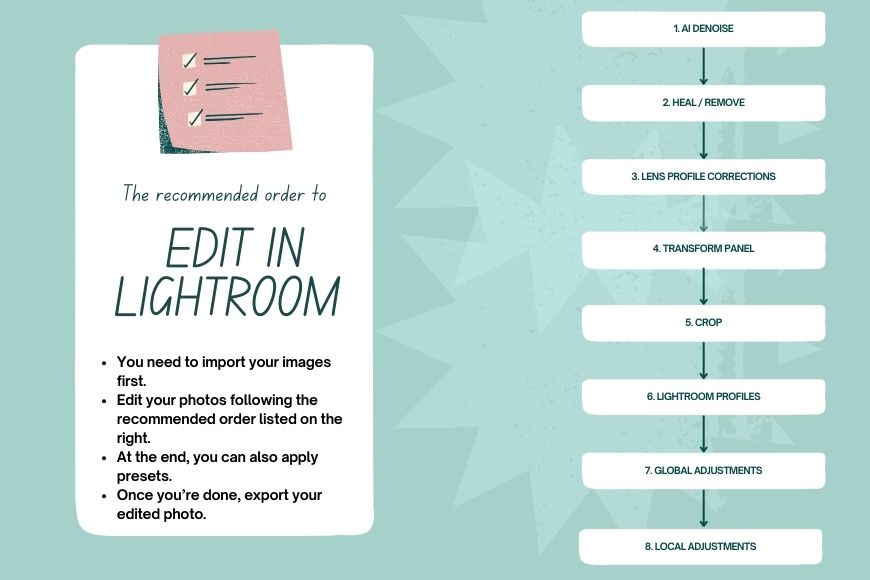
What Order Should I Edit in?
Many photographers have their own photo editing methods; however, to get the best results, some tools should be used before others.
Adobe updates its recommended order of operations as it releases new tools. So, I’ll share the current order here. I’ll also explain why each tool should be used before or after others and their basic functions.
(Feel free to review the Adobe website after any major update to see if their recommendations change.)
1. AI Denoise
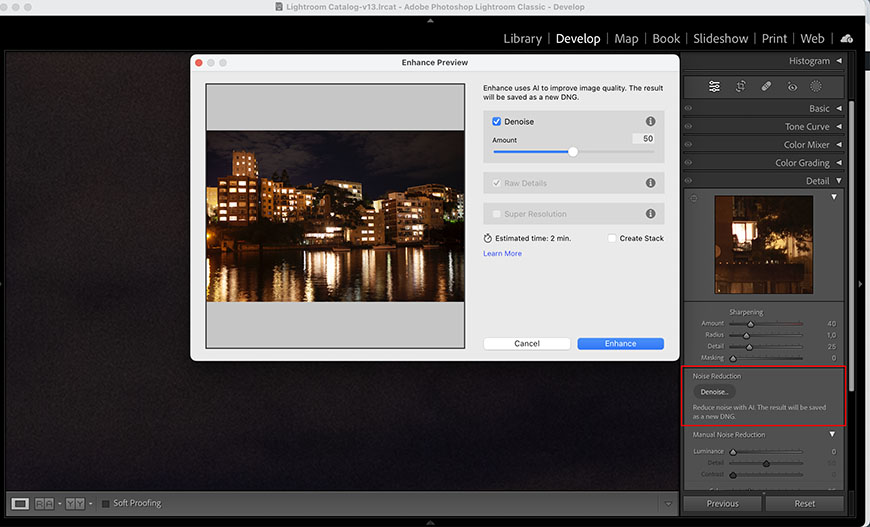
The AI Denoise tool arrived in Adobe Lightroom in early 2023 – so make sure you’re using a later version to have this tool available. Otherwise, you’ll only have the basic Denoise tool.
If you have the tool but it’s greyed out, you don’t have a supported file type. At this moment, AI Denoise is only available for Bayer and X-Trans RAW files.
Of course, not all photos need this edit, but if you have one that does, Adobe recommends using this tool first. This is because it might change the results of other tools applied beforehand.
You can find the AI Denoise tool in the Detail panel on the right of the Develop module. To launch it, click the Denoise button in the Noise Reduction section.
In the dialog box that pops up, the Denoise option will be enabled by default. You can adjust the intensity using the slider.
To decide how much you want, you can use the preview window – press and hold to see the previous version.
You’ll see the estimated time underneath – the higher the amount, the longer the time. When you decide on the right balance between intensity and time, uncheck the Create Stack option and click Enhance.
Once the enhancement is done, Lightroom will create a new DNG file, which will appear next to the original in the Filmstrip and the Grid.
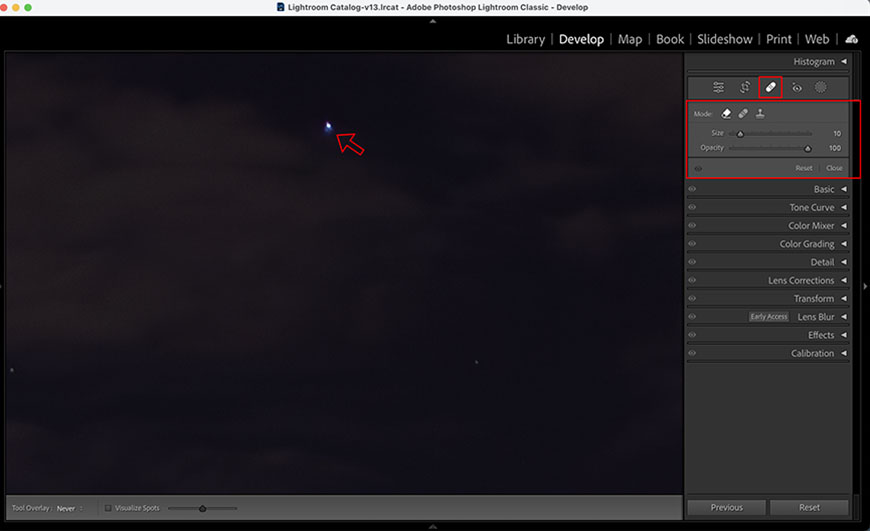
2. How to Use the Content-Aware Remove/Heal/Spot Brush
Adobe recommends using the Healing tool in Lightroom only if you need to correct a few spots – for example, removing a few people from the background or garbage on the floor.
However, if you have to fix hundreds of spots – such as the specks of dust resulting from a poorly scanned negative – Adobe advises you to use Photoshop.
Photoshop is also best for portrait work, like removing blemishes from skin.
The Healing tools in Lightroom allow you to fix selected localized areas of your picture. You can do something as small as fixing a spot caused by a speck of dust on the sensor to remove an unwanted person.
Not all pictures require you to use this edit, but if you want to use it, it’s best to do so after the AI Denoise but before other edits.
You can enable the Healing tool with its keyboard shortcut ‘Q’ or find it on the toolstrip on the right side of the Develop module. You can identify this tool by the band-aid icon.
There are three possible ways of using the Healing tool: Content Aware Remove, Heal, and Clone.
The Content-Aware Remove tool fills the selected area with newly generated content from a sampled area.
The Heal option will match the lighting, texture, and shading from the selected area to the one on the sampled area.
Lastly, Clone will copy the content of the sampled area and paste it on the selected area.
All three allow you to change the size, feather, and opacity to get better results.
You can use the Visualize Spots feature to invert your photo and clearly see imperfections. This option is available on all three of the healing tools. Simply go to the bottom of the canvas and check the box next to it.
3. Applying Lens Profile Corrections
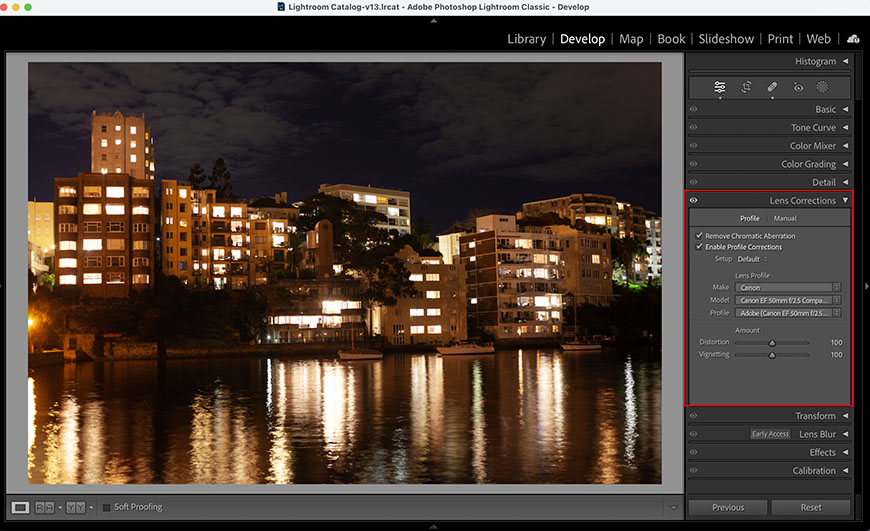
As you probably know, all lenses create some sort of distortion and chromatic aberration.
Most manufacturers provide a lens profile correction, which is then included in photo editing programs such as Lightroom.
For optimal results, Adobe recommends applying lens profile corrections to RAW images. You might get unexpected results if you use other formats, such as JPEG.
If this is your case or your lens isn’t included in the available lens profiles, you can manually correct the lens distortions. Then, you can save these corrections as a custom lens profile.
To apply a lens correction, open the Lens Corrections panel on the right side of the Develop Module.
Then, on the Profile tab, check the Remove Chromatic Aberration and the Enable Profile Corrections boxes.
You’ll see the brand and model of your lens appear in the profile section. If there’s a mistake, you can open the drop-down menu and select the correct one from the list.
You can also adjust the Distortion and Vignetting amount using the sliders.
3. Using the Transform Panel
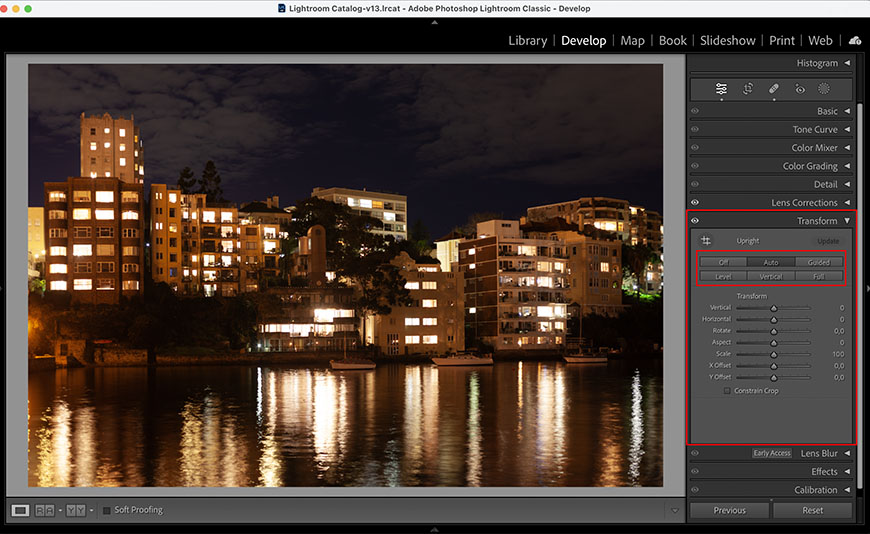
You can use the Transform panel to correct vertical and horizontal distortions. These distortions are created by perspective – not by the lens.
This is why the lens profile won’t fix them, but it’s important to apply the profile first to know which ones you still need to correct.
The adjustments made in the Transform Panel will overwrite any crops you’ve made previously. This is why you should use it before using the crop tool for composition purposes.
In the Transform panel, you’ll find several options called Upright modes. The most commonly used is Auto, which corrects the horizontal and vertical lines. It will also keep the aspect ratio.
If you prefer to correct only one of those, you can use Level for the horizontal lines and Vertical for the others.
The Full mode combines the other three – however, it won’t protect the crop and aspect ratio. As a result, you may find empty areas in the corners if the correction is too intense.
To prevent this, you can enable the Constrain Crop option. However, this may crop too much of your image – so use it carefully.
To find the best results, you can click on each option and see which one looks better. You can also make manual adjustments using the sliders.
4. How to Crop in Lightroom
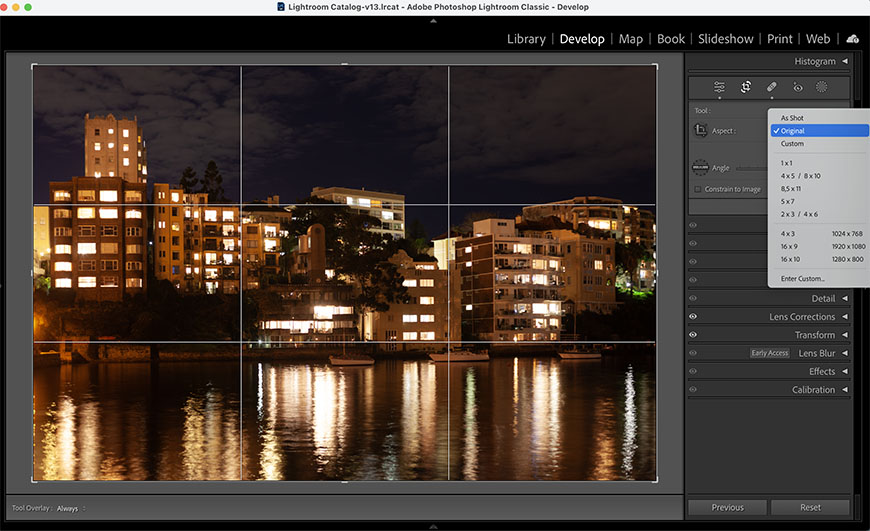
After you’ve corrected the lens and perspective distortions, you can crop your photos. You may want to do this to change the aspect ratio or to improve the composition.
You’ll find the Crop tool in the toolstrip. Here, you can change the aspect ratio or lock it to resize the image without changing it.
You can open the drop-down menu to choose a preset or simply drag the borders to make a custom one.
It’s also possible to rotate the photo by using the Angle slider. Check the Constrain to Image option if you want to crop the picture as you rotate it to avoid having empty borders.
5. Using Profiles

Now you can start color photo editing. Adobe Lightroom profiles are a great starting point because they tell the program how to interpret the colors in your picture.
You might be familiar with color profiles such as sRGB or Adobe RGB and your camera profiles. Well, Lightroom profiles are another way to control this.
You can learn more about Lightroom profiles here.
Using Lightroom profiles, you can be sure that all your photos have the same base. This will make it easier for you to get a more uniform look.
Remember, profiles are not the same as presets. To find the available profiles, go to the Basic Panel on the right side of the Develop Module.
6. Applying Global Adjustments in Lightroom
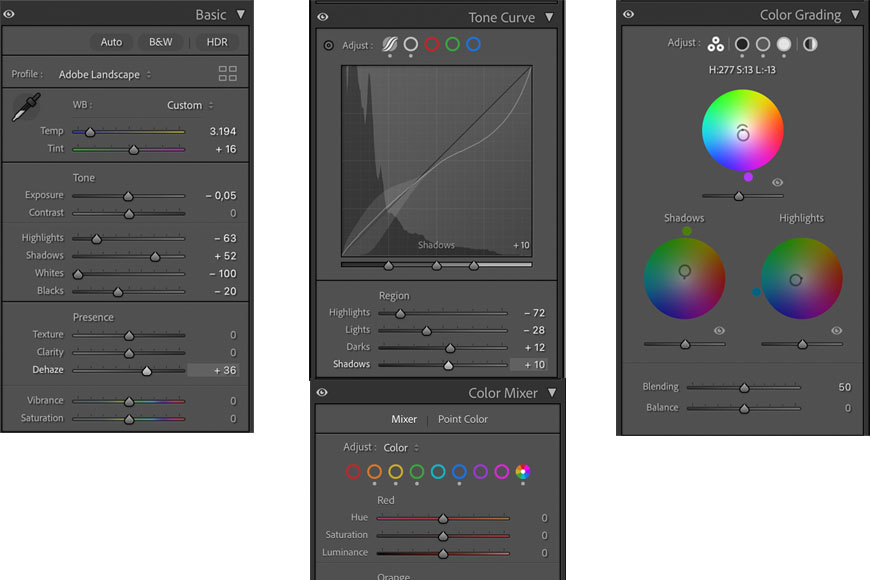
The next step is where you get to do light and color adjustments on the entire image. You’ll find all the tools for this part of the photo editing on the right side of the Develop Module.
First, there’s the Basic panel. Here, you can fix the white balance using one of the presets or by using the Temp and Tint sliders.
Next, you’ll have the sliders to control the tone. The exposure slider will affect the overall brightness of the photo. You have the other sliders if you want to control which ones to adjust.
The Whites and Blacks sliders control the brightest and darkest tones of the photo. Then, the Highlights slider controls the light areas, and the Shadows slider controls the dark areas of the picture.
Here, you can also adjust saturation, vibrance, dehaze, etc.
Next, there’s the Tone Curve. Here, you can adjust the bright and dark areas with more detail. You can check our in-depth guide to using the Tone Curve if you’re unfamiliar with it.
You can use the Point curve for more precise photo editing or the Parametric curve to work in zones. The Tone Curve also allows you to work within the color channels separately.
Under the Tone curve, you’ll find the Color Mixer and the Color Grading (previously Split toning) tools. These allow you to adjust or change the colors for artistic effect.
The Color mixer uses sliders, and Color Grading uses the color wheel.
7. Applying Local Adjustments in Lightroom
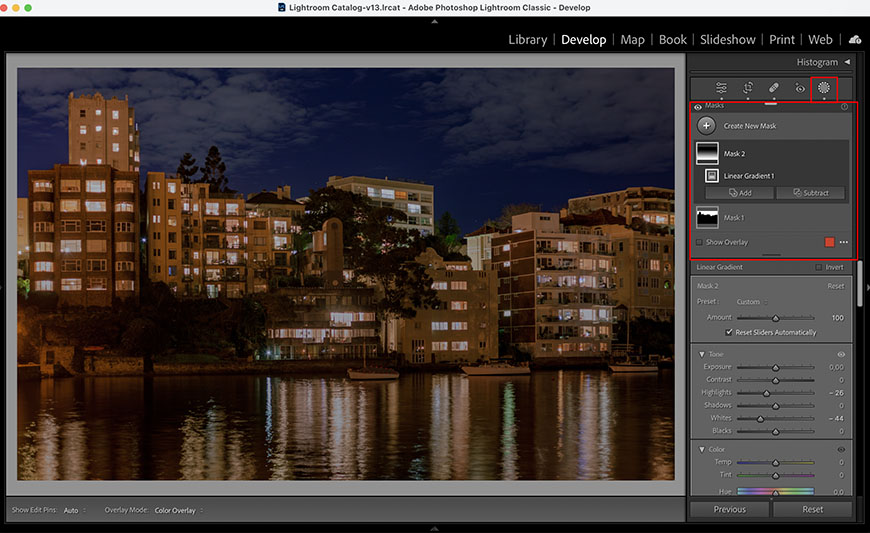
Adobe Lightroom also lets you fine-tune the editing by making local edits. You should make these after the global ones – otherwise, they’ll be affected when you begin editing the overall image.
You can use the Mask tools and the Brush tool to make selections and determine where to apply the edits. Then, you’ll have the usual editing controls from the Basic panel.
Using Lightroom Presets
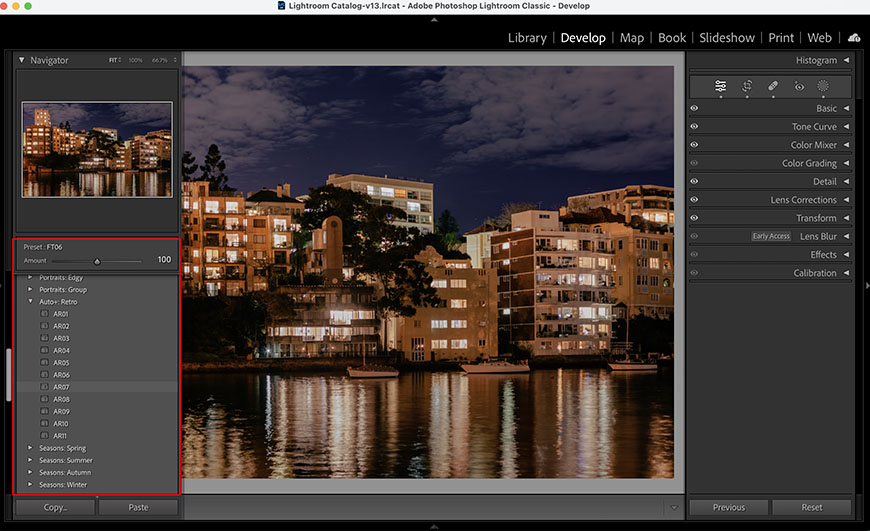
Lastly, you can apply presets to give your edited photos the same look. This is good for maintaining consistency in your editing style.
There are some pre-loaded presets from Adobe Lightroom. However, you can import more – many professional photographers sell them.
It’s also possible to create your own preset. You can follow our guide to Lightroom presets to learn how.
Unlike all the other editing tools, the presets are on the left side of the Develop module.
Editing With Other Programs From Within Lightroom
While Lightroom is an excellent editing program, there are things you may need or prefer to do in others. That’s why you can edit in other programs from within Lightroom.
There are two ways of using other programs in combination with Adobe Lightroom. The first one is to go to the menu Photo > Edit In.
Here, choose the software you want to use – it may be from the Adobe family, such as Photoshop, or a different developer, such as Luminar.
The second option is to use plug-ins. Let’s say you’ve rated and culled your images in Lightroom, and now you want to move on to Topaz Photo AI.
Well, simply go to File > Plug-in Extras > Topaz Photo AI.
Once you’re done editing photos in a different program, apply the edits or save the file to access it in your Lightroom Library.
I’ve Edited My Photo – Now What?
As I mentioned at the beginning of the article, Adobe Lightroom doesn’t apply your edits to the original image – it simply saves them as a set of instructions.
So, after you edit photos in Lightroom, you need to export them to save the edited version on your hard drive, share it online, or send it out to print.
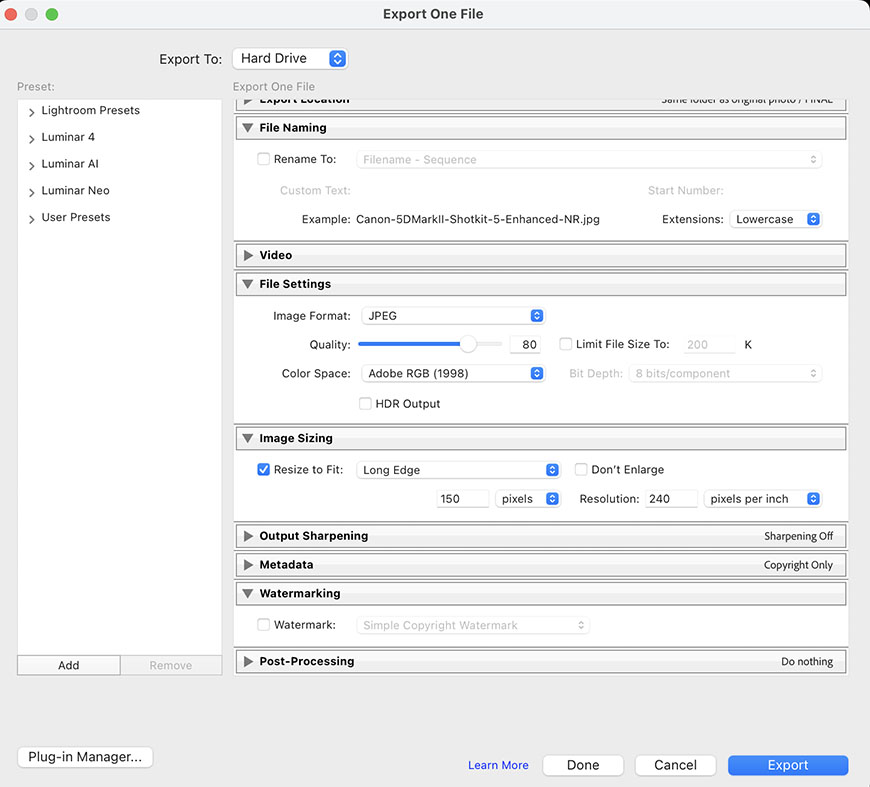
To export your photo, go to the menu File > Export. This will launch a dialog box where you can choose the file name and type, the size and image quality, the metadata you want to include, etc.
The Export feature in Adobe Lightroom gives you plenty of flexibility. To have a more in-depth look, check out this article.
For inspiration on editing images in Lightroom, check out these 10 Lightroom before and after examples, where pro photographers have shared their step-by-step editing process.
FAQs About How to Edit Photos in Lightroom
What’s the best way for a beginner to learn Lightroom?
There isn’t a right or wrong way to learn how to edit photos in Lightroom. I suggest you start with an introduction guide or tutorial. Then, start practicing with your own photos and see where you’re getting stuck or which doubts you’re having.
At this point, you can choose more specific tutorials to master Lightroom’s multiple tools. However, just take the approach that you find most helpful. Remember that the most important thing is to practice.
How do I edit photos like a professional?
If you want to edit photos like a professional photographer, first learn the fundamentals of the program. Once you know how the tools work, you can take control of your edits.
Using one-click solutions without knowing how they work will give you inconsistent results and won’t help you develop professional skills.
What are the basic adjustments in Lightroom?
You’ll find most basic adjustments in the Basic panel, including white balance and exposure correction. However, applying a lens profile is also crucial.
Does Lightroom auto edit photos?
You’ll find an Auto option in the Basic panel that automatically adjusts the basic settings. However, this option doesn’t consider crucial edits like fixing the lens distortion.
On the creative side, using presets applies an automatic set of adjustments that change the final look of your photos.
What are the different Lightroom editing techniques?
Adobe Lightroom offers a wide variety of editing techniques. You can choose between auto and manual tools, AI-powered or not, presets, profiles, etc. Plenty of tools are available to develop your own method and process.
What are the different Lightroom editing styles?
Lightroom offers enough tools to develop any editing style you want – natural, HDR, vintage, matte, moody, etc.
How do I edit photos in Lightroom for Instagram?
For the basic editing steps for Instagram, you need to crop your image to optimize the aspect ratio. Then, apply the basic adjustments, add a preset, and export your photo.
How do you paste edit settings to all photos in Lightroom?
To copy the edits from one photo and apply them to other photos, select them all and click Sync. Then, check the boxes of the edits you want to copy and click OK.
Is it better to edit photos in Lightroom Classic or on my phone?
Adobe Lightroom Classic has more powerful editing tools than Lightroom CC. Also, using the Lightroom app, you’re using a smaller screen, which makes it more difficult to make precise targeted edits.
How can I edit photos in Lightroom for free?
The Lightroom app has a free limited version. Otherwise, there’s a free trial for all versions of Lightroom.
Credit : Source Post


